Showing posts with label Makeup Looks. Show all posts

Thursday, March 15, 2012

Luck of the Irish!

Hello Royal Beauties! Guess what is coming up?! St. Patty's Day! YAY! Hahahaha I love this holiday, I think its so fun! So!! I wanted to come up with a St. Patrick's Day look to share with you guys and hopefully inspire you to create your own "green" themed makeup look for this Saturday. Let's get to it! Here are the pics!


To get this look:
I used NYX trio eyeshadows for the green. I put all three shades on my lid from lightest in the inner part to darkest in the outer corner and blend!! I also put the middle green shade along my lower lid close to my lashes. I used ELF cream eyeshadow in Candlelight in the inner corner by the tear duct and then just tapped a white powder eyeshadow on top of it to set it. I lined my upper and lower lids in black liner and then curled my lashes and put on my favorite mascara. Then I chose to add rhinestones to add some sparkle, but those are optional:) Then I put on my favorite ELF bronzer, and ELF HD powder, and then a nude lip stick. And that's it! You're done! :))

Have a lucky St. Patrick's Day!

Saturday, March 3, 2012

Abstract #2

Hey Royal Beauties! My friend Alli sent me this abstract picture for this series, and wanted me to do a makeup look for it - I think this picture is so cool!


SO! I wanted to make sure that I emphasized the "tear drop" kind of a pattern that is seen throughout this picture. And I also wanted to make sure that I got the layers of color and shape into the look. Here is what I came up with!


So I put the yellow color on my lid up to the crease. Then I added a blackish/brownish (I mixed the two) in my crease, and brushed it around the outer corner of my eye and brought it down to the outer third of my lower lid. Then I put a copper color on the top edge of that to blend it out. I lined my eye and put on my mascara. In order to convey the shape of the picture to my eye, I put a black rhinestone on my inner corner (you can also create the same "point" effect with eyeliner) and put a half circle of rhinestones along the edge of the eyeshadow to emphasize the outer oval shape. And that was it! I hope you like this look and it inspires you to create something beautiful! Email me a picture that you like from the internet or that you created and I will create a makeup look and do a blog post on it! (royalbeautymakeup3@gmail.com) Don't forget to "like" Royal Beauty on Facebook! Much love! Have a WONDERFUL Saturday... Smile:) xoxo

Sunday, February 26, 2012

Guatemala Art Inspired

Hello Royal Beauties! Ok, so as some of you know, I have a passion for Central America! I have been to Nicaragua, Costa Rica, Honduras, and Guatemala and I speak spanish!! Those countries are beautiful - in terms of culture, land, and people! I LOVE it. So! I have this painting of Lake Atitlan up in my room and I wanted to do a makeup look off of it because the colors were so beautiful! 


And here is the look that I came up with off of this beautiful picture!!


And that is it! Very bright, lots of fun:) I used my 120 palette to create this look. I really hope you guys like  it! Email me if you have a picture and you would want me to create a look off of it! :) Be creative and be inspired! Be YOU!

Thursday, February 23, 2012

Sassy Classy School Girl - Look #3

I haven't been doing enough of these looks, so I apologize beautiful girls! SO! This is a very simple and very quick look to do any school or work day when you are a little crunched on time. It is inspired by a look from Rihanna's music video You Da One. Very simple, very chic, and very classy. :) And THAT is what we want! Here is a picture from the music video that inspired this School Girl look:


And here is the Sassy Classy School Girl look that came out of it!! :)


3 STEPS TO GETTING THIS LOOK:

1. Simple Eyes - Apply a primer (optional, but strongly recommended). Next apply an eyeshadow that is close to your skin tone - shimmery or matte, whichever you prefer. Then take a deeper brown eyeshadow and work it from the outer corner of your upper lid and bring it 3/4 of the way into your crease, towards the inner corner of your lid. Take some of that same shade of the darker brown, and gently brush it on the outer 1/3 of your lower lid. Curl your lashes (optional). Apply 1-2 coats of your favorite mascara on the upper lashes, and one very light coat on the bottom lashes.

2. Flawless Face - Apply a coat of your favorite foundation, and then conceal any trouble spots that you still see (redness, dark areas, blemishes). Add a bronzer, or a contour shade, or a blush, anything to give your face a more defined shape.

3. Lovely Lips - Apply a fairly soft, but deep, shade of lipstick - or just simply whatever your favorite is! You can choose to line your lips with a slightly darker lip pencil if you want to go for a sexier look! ;)

And that is all!!! Once again, I really hope you guys liked this post and that it inspires you and gives you ideas and inspiration to create your own simple on-the-go looks! Love you all! Stay strong!

Wednesday, February 22, 2012

You Da One - Rihanna Inspired makeup!

Hey you Royal Beauties!! Ok! So I LOVE Rihanna - she is beautiful AND an amazing singer. So I wanted to do an inspired makeup look from her new music video for her song "You Da One". Here is a picture of her look from the video (which is mostly in black and white):


And here are some pictures of what I came up with:))


Tell me what you think about how it came out! Email me if you would like to see a makeup look from your favorite music video!! Blessings Beauties!! Keep rocking out and loving life!:)) xoxo

Saturday, February 18, 2012

Abstract #1 - Golden Dream

Hey guys! So I am going to be starting another series, and it will be based off of abstract art and abstract pictures that I find online. This is the first of this new series! So comment and tell me what you think of the look and the ideas for this series! This was the picture:


It has got a great color scheme. The base of it is the gold, copper, and brown tones, with green and teal accents. So seeing this picture, I created this eyeshadow look....


I hope you like it! Stay tuned for more looks in the series! If you find an abstract picture that you really like, email it to me and I will post it on my blog along with the look that I create based off of that picture! Would love to hear your feedback! Don't be afraid to BE YOU! I love you all :))

Wednesday, February 15, 2012

Valentines Day LOVE! :)

Hello Beauties!! Its that time of the year again, where we show the most important people in our lives how much we love them! :) I am single right now, and proud of it! Be strong and be confident in who YOU are and love YOU for being the beautiful woman God created you to be! So now, I am asking you my friend, to....


:) :) :) I am reaching through the computer screen right now and giving you a bigggg hug! :)) YOU are beautiful and YOU ARE LOVED!!! So now I just wanted to share with you guys some pics of the makeup look that I did for this special day!


Pink and hearts all around:) I hope you guys like it and I just want you to know how special you are. And I want to encourage you guys to not wait until this one day each year to really show people how much you care about them, or tell them you love them! Jump at any opportunity you can EVERY day or the year:) If you have a Bible in hand, I would love to encourage you to read 1 John 4:7-21 sometime if you get the chance! Blessings beautiful girls! MUCH LOVE! Xoxoxo

Sunday, February 12, 2012

Sadies!!

Last night was the Sadies dance for Valor Christian High School! :) It was super fun, I loved dancing and seeing all my friends - despite getting completely lost on the way there! I had so much fun! It was a great experience and I left it with some great memories. :) So! I wanted to share with you guys what I wore and what my makeup looked like!!


I wore this cute little purple button up dress, it went midway down my thighs, with black leggings and my favorite purple vans! And then I accessorized with bracelets, rings, and a cute little necklace. Moving on to my makeup... Here are some shots of what it looked like:


It was purple and black with sparkles - what else do you need?! ;) It was super fun to create, and after 4 tries I finally came up with something that I liked and that looked good! I used colors from my Sleek "Me Myself and Eye" palette, as well as my Maybelline "Color Explosion" eyeshadow in Amethyst Ablaze. I hope you like what you see and get ideas from this bold sparkly look! Blessings! Thank you for your support!!! Xoxo

Monday, January 30, 2012

Sassy Classy School Girl - Look #2

Hello fellow Beauties!
I am excited to show you all the second "Sassy Classy School Girl" look, and I really hope that it inspires you and gives you ideas on how to enhance your natural beauty in only a few easy steps! So here are the pictures of this classy school girl look:


As you all can see, this is a very natural, subtle look, that you can use to make your best features pop! Make it you and make it beautiful!

Steps to getting this look:

*NOTE: When recreating this look, you can use whatever products and whatever shades you like to make it suit you best! These are just my general recommendations based on what I did to achieve this look.

1. (Optional: apply your primer and/or base.) First, take a light, skin-toned, brownish shade of eyeshadow, and apply it from the inner corner and cover the first 3/4 of the lid. Then take a deep brown eyeshadow and apply it from the outer corner and blend it in (on only about the outer 1/4). Make sure that you blend this really well, so that it just gives that dimension to the eye. The last step for the eyeshadow is add a pop of color in the crease! For this look specifically, I would choose a color that is the same color of your eyes, and a similar shade so that it makes your eyes pop, yet still looks very sweet and natural.

2. Liner and mascara! As you can see, the liner and mascara are fairly simple for this look. Put a thin line of black eyeliner (pencil, gel, liquid - whichever you prefer) right up against your lashes on you UPPER lid. If you want, you can apply a little bit of liner on the bottom lid, but not much! you don't want it to distract from the subtlety of the look. Next, take your mascara, curl your lashes if you have an eyelash curler, apply 1-2 coats of mascara. Make sure your mascara doesn't get clumpy, and that your lashes stay as separated as you can make them. Tip: you can use your finger to help with this ;) Don't apply any mascara on the bottom lashes.

3. Fill in and/or shape your eyebrows. This is important because it really does help frame your face, and add that polished, chic look and that helps complete the overall look. So, its worth it to makes sure to add this step to your routine in the morning! :)

4. Apply a very very lightly colored, natural blush - I recommend a light peachy or tannish shade. I actually personally didn't use blush, I only used my bonzer for this look. It has a very pretty tone to it with several different tan shades as well as some peach shades mixed in. It added that natural sculpt and color to my face. But you can use whatever your favorite blush or bronzer is that makes you look polished to perfection!

5. Gloss those lips girl! ESSENTIAL! Do NOT forget this step!! This will take any look to a whole different level. :)

Comment or email or message me with comments! I really hopes this helps expand what you think you can do with your makeup!! Thank you for all your support. Blessings beauties! Rock this look to your school or workplace and know that you look extra beautiful. :)) xoxo

Saturday, January 28, 2012

RASTA!!!

Ok, so the much requested, long awaited RASTA inspired makeup!!!!:) This is posted in celebration of 1,000 views on my blog!! Now this is NOT to promote any drugs or anything like that - just to show you all how awesome the colors are!! So! This is a good idea of what "Rasta" colors are - green, yellow, red, and black:


SO! Here is now the makeup look I came up with based off of these amazing colors!:)


So fun! I really like how it came out, and I hope you do too!! I got lots of compliments on it when I went out shopping, and it was so much fun to create and wear.... I hope you like how it came out and that it inspires you! Stay strong and stay beautiful!! You are a Royal Beauty and don't be afraid to be YOU! :) xoxo

Tuesday, January 24, 2012

Sassy Classy School Girl - Look #1

Hello all my beautiful friends!
So! I have gotten a request from several people to start a series that has tips, tutorials and ideas, for simple, pretty and easy-to-do makeup looks that anyone can do! This is the first post of the series, tell me what you think!

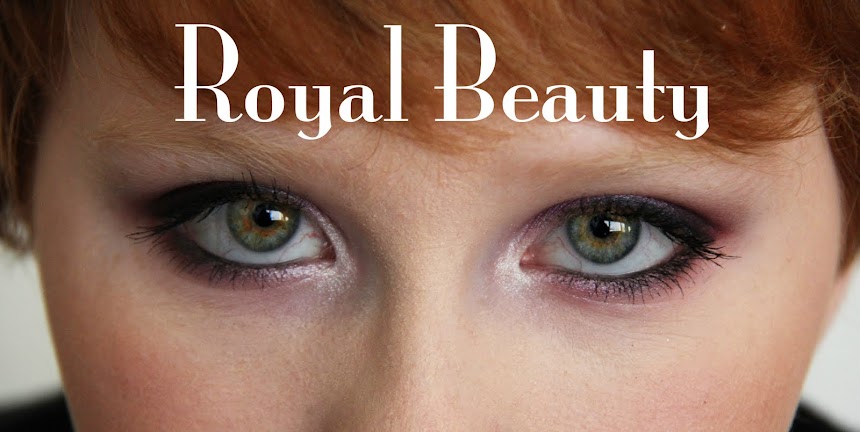
Ok, so this is the look!


Tips/keys on how to get this look 5 EASY STEPS:

1. I only used ONE eyeshadow color for this look. (WHAT?! Ya, I know. Hahaha.) So! First step: choose a color that you like that contrasts with your eyes. (Blue: gray/brown; Brown: pink/green, Green: purples.) I would recommend applying a primer and/or a base before you put on your eyeshadow, it helps it stick better and last longer and have a brighter pigmentation! Second, since we are only using one color, I would recommend using a color with multiple shades inside that one eyeshadow. For example, this is what I used:


Hopefully you can see in the picture, there are many different tones and shades of purple in this eyeshadow. Which definitely helps add dimension even though you are only using one shadow.
I know that Ulta carries this brand, Maybelline has something similar, and so does MAC. So, there
are many different options, so go get you some!! It is a VERY good thing to add to your makeup!

2. Next, line your upper and lower lid with a black liner (with pencil or gel or liquid - whichever you prefer). Curl lashes (optional, but recommended). Apply your favorite mascara:)

3. Fill in eyebrows, make them look full! This helps frame the face, and accentuate your eyes. This step is optional, but highly recommended if you have an extra two minutes before you walk out the door!

4. Add some color to that face! This just adds so much to the overall look. Throw on some blush or bronzer  (whichever you prefer) or both! It makes you appear more awake and youthful and definitely gives you more of a glow, so don't forget to put on some blush.

5. The last and most important step... GLOSS! Do NOT leave your house without gloss on your lips and in your pocket or in your purse. This pulls the whole look together and polishes everything up! And it adds a LOT! So when you are on your way to school or work, make sure to bring lip gloss, it will just add that "something" and enhance the natural beauty of your face! :)

You are a royal beauty! So take time to enhance your natural beauty and make you feel even just a little bit better about yourself and more confident because you feel more beautiful. I hope that this gave you some tips and ideas on how to put a simple, easy look together! More on the way! I love you all!! Blessings beauties:) xoxo