Monday, January 30, 2012

Sassy Classy School Girl - Look #2

Hello fellow Beauties!
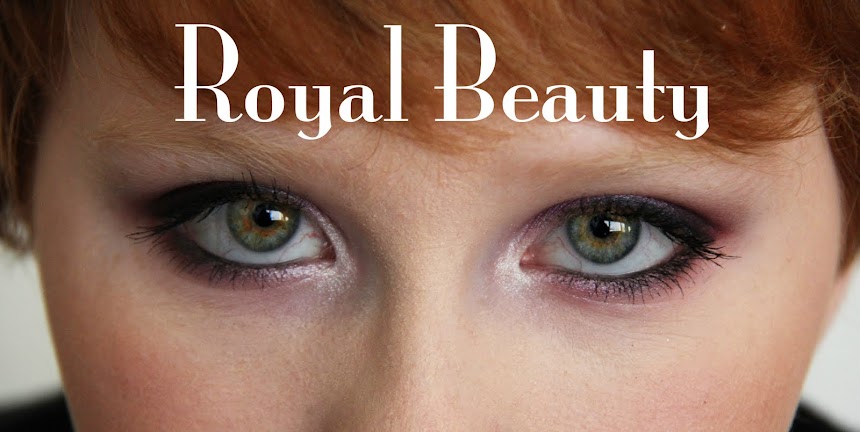
I am excited to show you all the second "Sassy Classy School Girl" look, and I really hope that it inspires you and gives you ideas on how to enhance your natural beauty in only a few easy steps! So here are the pictures of this classy school girl look:


As you all can see, this is a very natural, subtle look, that you can use to make your best features pop! Make it you and make it beautiful!

Steps to getting this look:

*NOTE: When recreating this look, you can use whatever products and whatever shades you like to make it suit you best! These are just my general recommendations based on what I did to achieve this look.

1. (Optional: apply your primer and/or base.) First, take a light, skin-toned, brownish shade of eyeshadow, and apply it from the inner corner and cover the first 3/4 of the lid. Then take a deep brown eyeshadow and apply it from the outer corner and blend it in (on only about the outer 1/4). Make sure that you blend this really well, so that it just gives that dimension to the eye. The last step for the eyeshadow is add a pop of color in the crease! For this look specifically, I would choose a color that is the same color of your eyes, and a similar shade so that it makes your eyes pop, yet still looks very sweet and natural.

2. Liner and mascara! As you can see, the liner and mascara are fairly simple for this look. Put a thin line of black eyeliner (pencil, gel, liquid - whichever you prefer) right up against your lashes on you UPPER lid. If you want, you can apply a little bit of liner on the bottom lid, but not much! you don't want it to distract from the subtlety of the look. Next, take your mascara, curl your lashes if you have an eyelash curler, apply 1-2 coats of mascara. Make sure your mascara doesn't get clumpy, and that your lashes stay as separated as you can make them. Tip: you can use your finger to help with this ;) Don't apply any mascara on the bottom lashes.

3. Fill in and/or shape your eyebrows. This is important because it really does help frame your face, and add that polished, chic look and that helps complete the overall look. So, its worth it to makes sure to add this step to your routine in the morning! :)

4. Apply a very very lightly colored, natural blush - I recommend a light peachy or tannish shade. I actually personally didn't use blush, I only used my bonzer for this look. It has a very pretty tone to it with several different tan shades as well as some peach shades mixed in. It added that natural sculpt and color to my face. But you can use whatever your favorite blush or bronzer is that makes you look polished to perfection!

5. Gloss those lips girl! ESSENTIAL! Do NOT forget this step!! This will take any look to a whole different level. :)

Comment or email or message me with comments! I really hopes this helps expand what you think you can do with your makeup!! Thank you for all your support. Blessings beauties! Rock this look to your school or workplace and know that you look extra beautiful. :)) xoxo

Saturday, January 28, 2012

RASTA!!!

Ok, so the much requested, long awaited RASTA inspired makeup!!!!:) This is posted in celebration of 1,000 views on my blog!! Now this is NOT to promote any drugs or anything like that - just to show you all how awesome the colors are!! So! This is a good idea of what "Rasta" colors are - green, yellow, red, and black:


SO! Here is now the makeup look I came up with based off of these amazing colors!:)


So fun! I really like how it came out, and I hope you do too!! I got lots of compliments on it when I went out shopping, and it was so much fun to create and wear.... I hope you like how it came out and that it inspires you! Stay strong and stay beautiful!! You are a Royal Beauty and don't be afraid to be YOU! :) xoxo

Friday, January 27, 2012

Thinking of Spring :)

Ok, so this is a look that is chilling for the weekend! Kind of a casual look. More cozy winter-ish style, but hopes for spring....


Ok, so this fashion friday, is a cool colored, cute, solid short sleeve shirt, and deep washed skinny jeans, and some simple tennis shoes. To give it more personality, spice it up by adding a fun scarf. This will be instead of the necklace, because its big enough to be one of the main focuses of the outfit. Next, continue accessorizing with some bracelets, and rings, and a watch or whatever you can use to make the outfit scream YOU!
On to the makeup...


I just put together some "cool" colored eyeshadows (teal, greens), and added some black liner, and mascara on my eyes, and threw on some blush and lip gloss and was ready to go! I hope this inspires you all to have some more fun playing with your outfits and makeup... Talk to you soon my Beauties!! xoxo:)

Thursday, January 26, 2012

What's coming up?!

Hello all of my beauties!

I just wanted to give you a quick heads up on what you will be seeing and expecting in the near future!:)

Friday (Tomorrow): The 2nd Fabulous Fashion Friday!!! WOOT! (Still thinking about what I am going to put together for you guys!)

Sunday: Rasta makeup look. Still trying to figure out exactly what I want it to look like in my head.


And Tuesday: The next Sassy Classy School Girl series!

Sometime before the end of February: My first tutorial video!! I will be getting the programs and software that I need this weekend... and we will see what happens!:)

Thank you for all your time and support! Email me with any requests or comments or questions! Blessings Beauty... Talk to you on Fashion Friday!:))

Tuesday, January 24, 2012

Sassy Classy School Girl - Look #1

Hello all my beautiful friends!
So! I have gotten a request from several people to start a series that has tips, tutorials and ideas, for simple, pretty and easy-to-do makeup looks that anyone can do! This is the first post of the series, tell me what you think!

Ok, so this is the look!


Tips/keys on how to get this look 5 EASY STEPS:

1. I only used ONE eyeshadow color for this look. (WHAT?! Ya, I know. Hahaha.) So! First step: choose a color that you like that contrasts with your eyes. (Blue: gray/brown; Brown: pink/green, Green: purples.) I would recommend applying a primer and/or a base before you put on your eyeshadow, it helps it stick better and last longer and have a brighter pigmentation! Second, since we are only using one color, I would recommend using a color with multiple shades inside that one eyeshadow. For example, this is what I used:


Hopefully you can see in the picture, there are many different tones and shades of purple in this eyeshadow. Which definitely helps add dimension even though you are only using one shadow.
I know that Ulta carries this brand, Maybelline has something similar, and so does MAC. So, there
are many different options, so go get you some!! It is a VERY good thing to add to your makeup!

2. Next, line your upper and lower lid with a black liner (with pencil or gel or liquid - whichever you prefer). Curl lashes (optional, but recommended). Apply your favorite mascara:)

3. Fill in eyebrows, make them look full! This helps frame the face, and accentuate your eyes. This step is optional, but highly recommended if you have an extra two minutes before you walk out the door!

4. Add some color to that face! This just adds so much to the overall look. Throw on some blush or bronzer  (whichever you prefer) or both! It makes you appear more awake and youthful and definitely gives you more of a glow, so don't forget to put on some blush.

5. The last and most important step... GLOSS! Do NOT leave your house without gloss on your lips and in your pocket or in your purse. This pulls the whole look together and polishes everything up! And it adds a LOT! So when you are on your way to school or work, make sure to bring lip gloss, it will just add that "something" and enhance the natural beauty of your face! :)

You are a royal beauty! So take time to enhance your natural beauty and make you feel even just a little bit better about yourself and more confident because you feel more beautiful. I hope that this gave you some tips and ideas on how to put a simple, easy look together! More on the way! I love you all!! Blessings beauties:) xoxo

Ocean Blues

Hello all! So a friend of mine requested that I come up with a look that is based off of this picture:


And much delayed, this is what I came up with!!:)


Basically, you can do this kind of look with any color you like. You start off with putting a lighter color in the middle of each lid. And then put a darker shade of that same color on the rest of the lid - each side of the lighter color. And blend it together. And then add a little bit of black on the edge of the inner corner as well as the very outer corner. BLEND! And that is it! I hope you like it! If you would like to see a look based off of a picture that you find that you like... email me! royalbeautymakeup3@gmail.com. Rock on Royal Beauties!!

Sunday, January 22, 2012

Shopping Spree with Me and Mom!:)

Hey Beauties!
So, I had an awesome Saturday yesterday, and I hope you all did too!:)
My mom and I went out together to have some girl time and do one of our favorite things.... SHOP!
I just wanted to share with you guys some of the fun stuff I got, because I am soooo excited!:)
Here we go!
First stop... Ulta.

There were a lot of buy one get one 50% percent off throughout the store. So, taking advantage of it, we each got ourselves two different Maybelline mascaras. I usually like their mascaras... but there was only in the past that I wasn't really too fond of, the Great Lash (pink and green) mascara... It just seemed kind of clumpy and cheap. But with this sale I wanted to try two different ones that I had never gotten before. I got the Colossal Volume Express and the Classic Volume Express Maybelline mascaras. And I am soooo excited about them!


I already tried the Colossal Volume (left) this morning... and I LOVE it!:)) Overall, I would highly recommend Maybelline mascaras! I am not willing to pay $20 or more for mascara, and I think the mascaras from Maybelline work just as well. Go get you some of these!;)

Next stop... Claires!!
Gotta love Claire's right?! I had gotten $40 in gift cards at Christmas for Claire's, and so yesterday we went to go spend it! Here is what I got!
Another pair of super cute sunglasses:


Nail stuff (because I am bad at painting my nails :P) - stickers and glue-ons:


And some fun bracelets!!!:)


And last stop.... VANS! AHHH:)) I am SO SO SOOO excited about my new shoes! I got this really pretty deep purple shoe with black laces. Here are the pics:


YAYYY! Ok, so that concludes my shopping spree, and I hope you guys had some fun:)) Let me know if you want me to do reviews on any of these things in particular. Another makeup look will be posted today or tomorrow! Blessings Beauties!!:)

Friday, January 20, 2012

Cute Comfy Style!

Ok, for my first Fabulous Fashion Friday, I am doing an outfit that is actually a little atypical of my usual style. It is cute and comfy, the best kind of outfit! ;) 


So, you can put this together with any sweat shirt and size-fitting jeans! I prefer the zipper kind, so you can make it more adjustable to the look you want. And then choose a shirt to wear under the sweatshirt that accents one of its colors!:) The next thing is a belt, it can be a very valuable accessory... It adds more personality to the outfit and also makes you look more put together! And next on the list is jewelry! Because I don't like to wear bracelets with long-sleeved shirts (most of the time you can't even see them), I usually go with a necklace and lots of rings. Choose a simple necklace that will just add to the look, and not be too dramatic or give the feeling that its too fancy for the rest of the outfit! For the rings, just have fun with it!! Don't be afraid to have different styles of rings or different colors...:) Just remember to be YOU!:)

And for my makeup, it was pretty simple! I will do this look in my school looks series with a tutorial soon. It was a simple green eyeshadow (NYX trio) look, and I only used two eyeshadow colors, and a fun purple eyeliner on the top and some mascara! Very easy, simple and pretty... and only took me like 10 minutes! I choose the colors based off of my sweatshirt. (Gotta love Tinkerbell!)


Hope you like it! Thanks for stopping by!:)) You are a Royal Beauty! Have a good Friday!!
 Much love, xoxo
Email me!

Bronzed Beauty!

Ok, so from what I know, a lot of people are intimidated by and refuse to use bronzer... this is because they don't know how to use it! If you are willing to try it out, or even consider it, then keep reading!

  •  FIRST THING'S FIRST! - Choosing the right color.
    • Everybody wants a beautiful sun-kissed glow, right?! But what you do NOT want is to look like an oompa loompa. Therefore, getting the right colored bronzer is a MUST. Many women make the mistake of getting too dark of a bronzer, and end up looking either orange or "dirty". So, when you are picking out a bronzer, find one that is ONLY one to two shades darker than your skin tone! Some brands help you with this, by labeling which bronzer is recommended for which skin tones. Bronzers can be powers, or liquids, or rub-on sheets... I personally prefer powder.
  • NEXT - How to apply it.
    • Keep in mind, no matter what, you only need a LITTLE bit to begin with, and if you want to, you can build it up to have a more noticeable color. But don't overdo it! So! How do I recommend applying bronzer? Lightly swirl your brush around in the bronzer, and tap off the excess product. Then, think: "where would the sun naturally hit my face?" First, gently sweep the bronzer across the outer third of your forehead, right up against your hair line. Sweep it down, past your eyes, and across your cheek bone towards the nose from the forehead. Do this to each side of your face. So basically you are making and outline of a "C" on each side. That is the most basic, if you want a little more of a bronzed look, then lightly sweep it down the bridge of your nose, and along the jawline. 
  • GO TRY IT! Don't be afraid to experiment! If you have any questions, email me:)
  • WHAT I RECOMMEND:
    • If you really want a cheap bronzer just to try out, then go for ELF brand (eyeslipsface). I recommend their $3 studio bronzers, but they also have just a $1 compact. The tough thing about these though is trying to match it to your skin color so it looks pretty, but I personally do like them. I use the Golden Bronzer from the Studio line. You can get these at Target or online at eyeslipsface.com/ 
    • My FAVORITE bronzer is the physicians formula "Powder Palette: Multi-Colored Face Powder" in light bronzer. It was around $10 and its perfect! I recommend the physicians formula brand for bronzers personally. They have a lot of different options (for different skin tones, matte, shimmer), they are reasonable prices, oil-free, fragrance-free, hypoallergenic, and they are very safe for sensitive skin and just... GREAT! 
      • Go check out their bronzers on their website: http://www.physiciansformula.com/en-us/product/face/bronzers.html
      • You can also find their products at Target!
So try out bronzers and see what you think! Blessings bronzed beauties!:))

It's Friday!!

Hello Beauties! It's Friday!!
I don't know about you, but on Friday's I usually take extra time to get ready because I want to look super cute... I mean its the last day of the week and the first day of the weekend! SO! I will start to make posts on Fridays, where I will make posts that show you guys some of my everyday fashion and makeup looks. This will hopefully give you guys some ideas, and advice, and inspire you to create your own unique style! First post will be going up today:)

Thursday, January 19, 2012

Selena Gomez... Color Crazy?!

Have you heard - or seen - the latest on Selena Gomez?! Yes, she is indeed still dating Justin Bieber. But Selena is coming out making a bold fashion statement that even shocked her fans. What was this crazy action you might ask? Check it out for yourself.... :)
Selena's got the blues!


She has died her hair a crazy, bright blue! AHHHH!! I actually really like it - I did actually die part of my hair blue this last summer too! :P What do you think of Selena's new look? :)
Love you all beauties!!:)) Just like Selena Gomez is demonstrating, don't be afraid to be YOU! :)

Monday, January 16, 2012

Just FYI....:)

Hey all!!
Ok, so just to let you know, if you haven't already figured it out... if there is a picture that you want to see larger so you can see more detail, just click on it! And it will pop up with a full screen viewing of all of the pictures from that post:) Just so you all know! Hahaha:)
Email me with questions, comments, or any requests of a look that you want me to create or recreate off of a picture, or a movie, or a celebrity look! YOU ARE BEAUTIFUL!!

The Fellowship of the Ring

Ok, so who loves the Lord of the Rings series?! AHHH:) I do! SOOO I wanted to do a makeup look in honor of it... and specifically this picture:


So! I based it off of the light tannish brown color that surrounds the center of the picture, and then the deep greens on the bottom. I put the gold color that is the famous Lord of the Rings logo on my inner corner to make sure that it was a part of the look too!:) All of the eyeshadow is from my 120 palette from BHCosmetics! Here is what it came out like:


Email me if you have any questions, comments or requests!!:) I love you all! You are beautiful on the inside and the outside!
royalbeautymakeup3@gmail.com